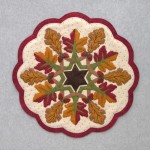
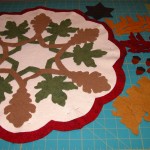
21-22″ Fall Leaves table topper brings autumn to your home, celebrating the season’s changing colors.
As promised, today I will begin a series of posts that will guide you through the basic construction methods and techniques involved in creating one of my table topper patterns. I have chosen to use the Fall Leaves pattern. This has been a popular pattern that I have rated suitable for an enthusiastic advanced beginner; by beginning construction now it would likely result in having it finished in time for autumn! (With its two alternating ‘snowflake’ designs woven together, the construction and concept is very similar to the Pinecones pattern – if you prefer to follow along with a that design.) This series of tutorials is not meant to be a pattern per se, but is designed to demonstrate and clarify the construction process and techniques I have used to create these toppers. As a former teacher, I have found that ‘visual’ is almost always an improved method of conveying ideas. Should you have a pattern with which you can follow along, that is great. My greater hope is that by reading the posts, etc, you will gain the understanding and confidence to then select and purchase any pattern of your choice and complete it with satisfying results!
To begin with, I would encourage you to read the general description of my patterns under Wool & Wool Felt Applique Patterns: this will give you a general idea of what instructions, etc. you have to work with! Please notice that my patterns are all full size, with the layout sheet being a 1/4 (90˚) full size section. Instructions for folding a snowflake template are also included, along with illustrations for a basic blanket stitch. If you click on the picture of a pattern laid out, you can get a close up view of the pattern contents. I trust you will find this helpful, as I have at times found myself a bit disappointed having purchased a pattern and finding the contents somewhat lacking! I would also encourage you to read about how I wash and prepare wool felt and/or felted wool; blog post 6/02/12, More Than a Topper. I really enjoy how washed felt functions when I work with it, but you may decide that you do not want to wash your wool felt – this is your option. The felt may feel a bit ‘thinner’ – hiding and sinking threads into the center of the felt may not work quite the same – but using the wool felt unwashed may be worth the trade-off for you.
A short note here…While I am sharing with you my methods and techniques for creating these toppers, please remember that as a teacher and an artist, I will always advocate for CREATIVITY!! If you find that you have a preferred method or technique, a favorite material, thread, or tool, or just plain ‘an idea all your own’ – by all means give it a try!! Just remember that in trying new ideas, etc. we must then assume responsibility for the the outcomes – the good (great!), the bad, and the ugly! I can’t assure you that your result at making my topper will be identical if you choose to use other materials, techniques, etc. However, when we take on the responsibility for our creative endeavors, I find it a win-win situation: no matter the results (ranging from utter failure to fantastic success), we are actively building our ‘stash’ of skills, techniques, material knowledge, etc. I usually suggest that when taking a class, following along a tutorial, or using a new pattern, that one should at least thoroughly understand how the project was intended to be done, before creatively deconstructing to one’s own desires!!
In the first steps of the pattern, I have given instructions for folding several ‘snowflake’ blanks out of either tracing paper or freezer paper. I use a 24″ wide roll of very lightweight tracing paper from which I cut off 24 ” lengths (so I have a 24″ square) and use these to fold the blanks. This does not have to be expensive vellum type tracing paper. I have found these rolls in drafting sections of art supply stores, regular art supply stores, or – if you want to save some running around – on the internet. Rolls come in 5 to 50 yard lengths, are quite economical, and I find that I use it for all kinds of sewing/quilting/designing purposes. You could also buy it in a pad – but I have not seen a size bigger than 18X24, so you might have to tape sheets together to get a 24″ sq. I’m not sure just how well the tape would fold, etc. and affect accuracy. In regards to the freezer paper, it is commonly available in an 18″ roll so that you can easily cut off sections for an 18″ square to fold. ( ALWAYS fold the freezer paper with the shiny side in!) Doing some research, I found that larger widths/sizes are available – apparently to the butcher/meat/grocery industry – but in quantities and prices that were rather high. You really would only need a large size if you wanted to use freezer paper to stabilize the base background layers while cutting them out – otherwise the 18″ is sufficient for all the applique snowflakes in any of my patterns. I have good luck using the tracing paper for the background bases and pinning adequately.
Using the patterns for the top backgrounds, you will create 2 separate tracing paper blanks; then trimming the open ends to the curved edges as are shown on the pattern templates – one is labelled as the ‘top front outermost base/background’ (red), while the other is simply the ‘top front base/background’ (cream). The ‘outermost background’ will always be the layer that shows up as the colored 1/2″-1″ margin around the topper. Unfold and pin these tracing paper patterns to your wool. Be sure to pin adequately so you are not distorting the wool as you cut (felted wool seems to distort a bit more easily than wool felt). Cut out carefully with a sharp scissors. I recommend working on a large enough surface to accommodate the entire circular pattern without having to move it – I have a ‘big board’ on my regular ironing board and I put my 36″ Olfa cutting mat on top of this. The smooth cutting mat surface actually allows me to slide the wool/pattern around gently as I cut. When done cutting these two background pieces, I refold the tracing paper templates and label them – for any future use!
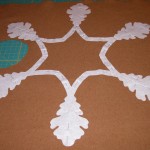
Set aside these backgrounds for the moment. Using the pattern sheet of applique templates, you can either cut out the actual patten template OR you can trace it and make your own. I’m kind of nut for keeping my patterns intact, so I usually trace and make my own templates – this allows me to always have a useable and intact pattern if I want to make it again. Do what works for you! Once more you will fold two ‘snowflake blanks’ – this time out of the freezer paper (remember – shiny side in.) Trace the oak and maple leaf snowflake templates on these blanks, as well as the ‘tip’ of the maple leaf template – this tip is the template for the brown center star. Note the hint I have written on the template page: I usually staple the template layers together (try to avoid lines where you need to cut!). This generally results in a much more accurate cut out pattern. Cut out the drawn templates using a sharp paper scissors. Remove any staples and carefully unfold the cut out templates. Set aside the center star. Place your the maple leaf ‘snowflake’ on your green wool, carefully adjusting, then pinning lightly. Move piece to an iron friendly surface and press with a hot iron to adhere the freezer paper to the wool. Repeat with the oak leaf ‘snowflake’ on light brown or tan wool. Using the center star applique that you set aside, place on dark brown wool and press. Set aside all three templates ironed on wool. (For a closer view, just click on each picture.)
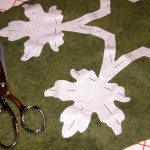
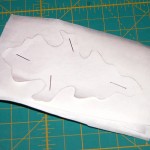
‘Reused’ maple leaf freezer paper applique needed a few more pins for accurate cutting. Note size of scissors that I find works well.
It is likely that you will not need as many pins as are shown in these pictures. This was my second usage of these templates and because of the ‘fuzzy’ nature of wool, they do not adhere as well in repeat uses. Extra pinning assures me that I will still have an accurately cut applique.
Using freezer paper and the remaining template patterns (1/2 maple leaves, whole oak leaf, acorn top and bottom), you can make freezer paper templates two different ways. The first is to trace the appropriate number of copies of each different template onto the freezer paper, being sure to place the freezer paper – shiny side down – on top of the pattern sheet when tracing. You will have one sheet for each different template i.e. one for oak leaves, one for orange maple leaves, etc. They can be traced quite close together, in any manner, as there is no particular grain you need to observe. You will have sheets of freezer paper with all the applique templates drawn out individually. You can then iron these sheets to the appropriate color of wool. (One thing to note is that if your pieces of wool are a certain shape and size, be sure your freezer paper sheet of tracings match the shape and size!)
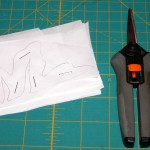
Stapled freezer paper stack of 1/2 maple leaf applique pattern and my favorite Fiskars scissors for the task!
Another way that these applique templates can be made is by cutting freezer paper pieces (the number of templates needed – ex. 6 oak leaves) larger than the template desired, stapling them together with just one traced copy on top, and cutting them out with a sharp paper scissors (I really like my little Fiskars spring scissors for this!). This saves time and cutting, and you instantly have multiple templates! Just be sure you adequately staple the stack together to prevent shifting, etc. This method works well, but not for the smaller pieces like the acorn.
Once the templates are all ironed on wool, I usually grab my sharp little scissors, a cup of coffee or a cool drink (depending on the season!), find a great TV show or movie that I can listen to without having to keep my eye on it every second, and start to cut out the templates. I have found it helpful to use a lap type desk. Before long, I have all my wool applique pieces cut and ready to be used. Let the fun begin in Fall Leaves: Part 2!



Great tutorials, keep up the good work.
We sound so much alike. I do the same when I’m cutting out my wool and patterns.
Is there a reason your not using fusible? Over the butcher paper.
Hello Aimee! Thanks for taking the time to view and to leave a comment. This is one of my earlier patterns and at that time I used the waxed paper so I could fold the paper into a ‘snowflake’ for tracing the design – which in the pattern is shown as a ‘pie shaped wedge’ of (in this case one sixth of the design). In those early years I didn’t use fusible as much as I do now – and often I added it later for the backing, etc (see further steps in the complete tutorial). However, today I would likely write the pattern differently as I now use fusible throughout my designs. Today I would use one of either the following processes:
1) place a paper backed fusible on the backside of the wool pieces used for the pattern, making sure the fusible extends a bit beyond the actual pattern pieces. [Note: Leave the paper backing on the wool base piece.] Then I would cut out the waxed paper pattern pieces, (open the ‘snowflake’ ones), and place these patterns – waxed side down – on top of the wool(with the fusible on the back) and press in place so the wqxed paper sticks to the wool. When cool, cut out all the pattern pieces on the traced lines. Peel the backing from the upper appliques and fuse to the wool background – making sure once again that the paper backing is still intact on the backing. This makes for a slightly stiffer finished piece, but it is also more stable and you’ll have very nice clean, non fraying edges. Also, while this design does not call for ‘reversing’ the pattern, using this method allows one to totally avoid having to figure out ‘reversing’ images! You will also find that you will be stitching through wool with fusible backing and while I find this no issue (you do need a more pointed sharper needle than some wool workers typically use), it may take some getting used to for the first timer.
2)You can also make/trace all the pattern pieces with fusible to begin with. Just be sure to cut out the paper backed fusible about 1/4″ beyond the template outline so that when you fuse it to the wool, you can then cut it on the actual pattern line. You will also need to remember to fuse to the ‘wrong sides’ of your wools as this involves ‘reversing’ designs that are not formally balanced in nature.
I think part of my thinking during the designing of this pattern was that since it actually uses TWO ‘snowflakes’ (maple leaves and oak leaves) which are ‘woven/overlapped’ together in the center area, that I felt it would be a bit easier to ‘weave them’ with out figuring out how to press the fusible. You could also place fusible on the back side of each of the snowflake templates, but not press them until all the stitching is done.
Also over the last number of years I have become aware of how unreliable waxed freezer paper is – today’s product quite often is not the old fashioned wax but some form of plastic and doesn’t adhere nearly as well. Some people have reported that they’ve had better luck getting freezer paper from a local butcher, etc. I also know that you can get a better quality by looking at brands such as Cut-Rite, although the sizes are usually no bigger than typing paper, etc.
Hope this is helpful to you. I am hoping to do a tutorial on using fusibles with wool – at DesignAndBeMary.you tube. Hoping to get that done early this summer! Meanwhile, happy stitching!