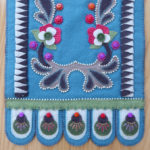
 This is most certainly an overdue posting of a tutorial that I have promised to make since posting my pattern called Native Beauty – a tribute to the wonderful needle and handworked art used by native women over the last few centuries. It seems to me that as most of us were taught in US history, we came to believe that the European women saw the need to teach Native women how to sew as a necessary part to make them acclimate to a more ‘cultured; American life style. Unfortunately, since those early years of American history, I have come to study, witness, and realize that most native women had tremendously handworking skills – working first with quills, then adding beads, buttons, metal pieces, and – yes – even wool fabrics as they increasing came into contact with the Europeans as well as other encroaching groups. They used bone awls, bone and natural plant needles along with sinew and plant fibers, and even the find hairs from moose or musk ox for threads – many materials quite suited to the life styles that various native tribes led. They developed unique concepts of color usage and design quite often very meaningful in their world viewpoint. Some tribes developed sewing ‘societies’ with the more gifted handworkers producing works for others within the tribe. If you’ve never had the opportunity, I would encourage you to seek out a museum or historical society and take some time to look at the wonderful pieces created by so many unnamed native women. Not really so different from viewing many of the pieces of handwork we see in our own Euro-centric backgrounds – often very beautiful and quite often by a woman never named.
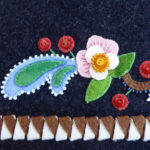 All that said, I’ve been lucky to live in a locale where I have been able to take classes from contemporary native needleworkers who have kept these arts alive and are willing to share their knowledge. After taking a quill work class, I couldn’t help but wonder if I could translate that skill to my wool work designs. Anyone who is familiar with me knows I enjoy seeking out unique and different applications of materials and techniques.Needless to say, the Native Beauty pattern features a border design done in the same way basic quill work is sewn. In this post I will take you through the basic steps in creating the ‘quill work’ look.
To prepare materials for quill work, you will need two contrasting fabrics. These can be two thin wools, a thin wool and a fine cotton (batiks preferred as they ravel less), or two fine cottons. I would encourage you to use solid colors or mute tone on tones – fabric designs would take away from the effects of the showing off the quill work folded design. Depending on the length of your quill work design (you could cut paper strips in the estimated width of the strips needed (no wider than about 3/8″) and fold these back and forth to get an estimate of the length of the fabric strips you will need), I would encourage you to use at least the width of the fabric (42″-44″) for the length of your strips. You will need an equal number of strips of each color. You will also need a fusible – I use either HeatNBond lite or AppliWeb Plus (Quilters Select). To prepare your quill strip you will need to cut the strips wider than you need them – say a 2″ wide strip. Cut the fusible the same width. Fuse the strips together, with one of each color. In the photo I used a light off white wool and a light brown mottled batik. Trim these fused strips to a width of 3/8″ – or smaller if so desired. See the pattern instructions for more complete instructions. You are now ready to begin sewing your quill work.
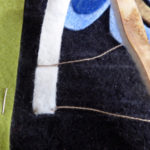
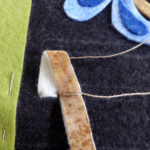
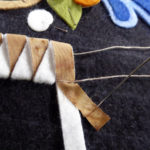
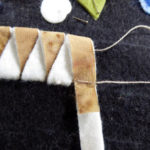
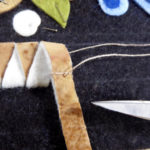
It may help in this tutorial to look at more than one photo at a time. That will help for you to see the progression of how the strip is folded and sewn. Draw two lines on your background, about 1/2″ -1″ apart – you can see those lines faintly in the left hand photo above. This is how wide your band of quill work will be. Place a strip as shown – with the bottom edge along the lower marked band width – and using a thread that blends with the strip colors, tack down the lower two corners and then allow the needle to ‘rest’ while you take another needle and thread and secure the top of the strip – along the marked width line – as shown. Looking ahead to the photo on the right you can see how this stitch is done – your upper needle will be coming up in the middle of the strip. Rest that needle along the upper marked line.
Fold down the strip at an angle, making sure the upper edge is folded along the marked band width and that the fold places the left edge of the strip right next to the right edge of the strip sewn to the bottom edge. Using the lower needle, and following the photo, stitch the strip to the lower marked edge – again coming up in the middle of the strip. With a carefully chosen thread color and tight folding, you should not see any of the thread showing. Continue in this manner – folding and stitching the strip along each edge of the marked band width (which will help keep your ‘quill work’ even. See the photo on the left below.
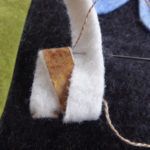
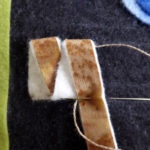
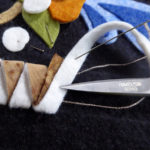
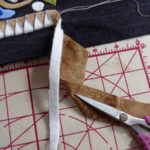
If you run out of the fabric strips, you can splice the fabrics and continue. (After all, the native women spliced those 2-3″ quills!) Looking at the middle photo above, stop sewing fairly close to when you are running out of strip. The key to splicing success is 1)to not splice both fabrics at the same place and 2) to place the splice on the inside fold so that it doesn’t show. Estimate where you need to cut the fabric to splice. Separate the fabric strips from the fusible (a little prying) and cut the fabric you are splicing. Then take another of your prepared strips and also separate the ends of the fabrics. Butt the end of the fabrics you are splicing together and I use the tip of my iron to re-fuse (or add a tiny piece of new fusible or a drop of glue) the fabrics. You will need to cut off the fabric that is not being spliced – so that the strip will remain even through out. Chances are it will only be a few more folds untill you will need to fuse the other side of the strip fabric! In the middle and right hand photo above you can see how I am estimating where the brown strip should be trimmed for the splice and how to estimate where will not be seen.
In the left hand photo above you can see where I finally trimmed the brown fabric so that the splice will be on the back (inner) side of the strip and not visible. Because I had a lot of the white wool strip left and did not have a prepared strip ready, I fused an oversized piece of the brown batik to the remaining wool strip, butting the edges together and then trimming the brown fabric to match the width of the remaining white wool strip. If you look carefully, you can see in the photo on the right where this splice is and how well it blends in. Once the spice is made, you can continue stitching your quill work band, ending with a a straight fold either up or down, and tack discreetly to the backing.
This may all seem a bit overwhelming and I can say that it certainly isn’t very easy to describe! I would encourage you to give it a try. You might surprise yourself. And who knows how creative you can get with this technique!

